Thursday, 16 May 2013

New ideas needs new reference, new reference means new concept art.


As I mentioned I'm going for a nanosuit look now so what better to refer to than Crysis, which is the majority of the reference I collected. Something I really learnt from the reference I  picked up is that similar to what I want to achieve their suits too follow the human male anatomy so it was perfect for me to look at.
One thing I won't be incorporating is their 'tube-like' look to their armour, as if it were all made from hundreds of tubes or something similar, I want my armour to be clear, shiny metal.

From this I again took my orthographics from the model I made and started to make concept art for what I actually want as a end product. This is what I came up with:
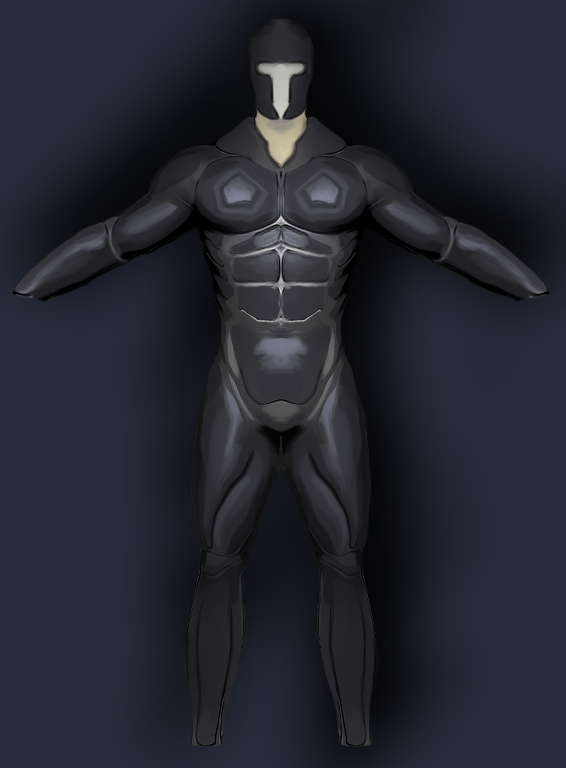

Again it does follow the human anatomy quite well but the most noticeable difference from my previous piece of concept art is that it covers almost the entire body, excluding parts of the face and neck. 
Using the mask pen and lasso to create polygroups I believe I can easily mimic the shapes and ideas presented in the above concept art. Once I have my entire body polygrouped I'll then proceed to use panel loops and move onto finer details and texturing.

This marks the end of week three and although I've taken quite a large step backwards I feel I've taken two forward in the sense that I know exactly what I'm doing and I know exactly how to do it, so now it's just a matter of doing it. I'm confident in three weeks I can complete everything I need to, the past two weeks haven't been so productive but I've learnt a lot and I plan to do a lot now.


Changing my approach to my design.

I'll be blunt in my reasoning for my change of design and that one reason is ZBrush 4R5, after experiencing and messing around with the panel loops function in the new version I just found that I could potentially have so much more control over the robotic armour side of things than just simply using basic brushes to build and mold form.
Panel loops is like a more advanced version of extract, where extract uses masks, panel loops uses polygroups, as many as you like.
From just a short session of using polygroups and panel loops I came up with this


From these two images you can see all the polygroups involved, and after you use panel loops you'll actually have new polygroups for the edges, so instead of having one, for example with a square shaped polygroup, you'd have 5-6 in total.
This is how it looks not in poly frame view.


As you can tell I have so much more control over what I can do with this instead of manually making forms or even using extract. 
So all in all, I've decided to give my character a complete makeover, and instead of being part-cyborg, I want him to being wearing some form of a nanosuit for his entire body, possibly a helmet but not covering the main features of his face (eyes, nose, mouth). A character from the future representing some sort of space army force.
I'll have to get together a new mood board of reference for my new approach. I don't think I'm too late in changing my ideas since I got through my first concept rather quickly and actually adapted to using panel loops quite efficiently so I don't think I'll lose any time in regards to my schedule.


Using concept art to get a start in modelling

First Concept Art

So as mentioned before I did carry on with my idea of using my basic concept mesh to actually make my concept art from. However compared to the end product of the video I last posted they're a lot of changes, I went in and started to focus on human anatomy properly and also using the transpose tool posed the character slightly differently, namely the arms being down.


FRONT ORTHOGRAPHIC

BACK ORTHOGRAPHIC

SIDE ORTHOGRAPHIC

This is the front of the character and as you can see half of his body is robotic, the design I followed was basically following human anatomy. I found myself really interested and into the idea of his armour following the human muscle groups almost completely. I feel like it would integrate really well into the rest of his body.
You may also notice a robotic replacement eye, a little reminiscent of the DragonBall Z scouter, but I believe that if nothing is on his face his body armour might just look like armour and not actually a part of him.
One thing I didn't actually draw on this was the pipes I wanted to include, just a few pipes on his torso connecting the robotic armour to his actual body. Additionally I didn't actually go on with my original idea of using the samurai trousers and instead decided to replace that just with a rope belt to keep a little bit of traditional design, almost nostalgic of what he used to be. 
Similarly the back follows the muscle group design too, a little varied as in it's not completely accurate but all in all it is still the same concept. 
On the side orthographic you can see the arm muscles a lot more defined and clearly, again these designs are almost following human anatomy completely accurately. 

This marks the end of week one and so far I'm actually a little ahead of schedule which is a pleasant surprise.


Concept modelling

So before I actually start doing any concept art I thought this would be a good exercise and method to get going for it. I wanted to make a basic human mesh so that I could just screenshot it from the 3 standard orthographic points of view and then draw some concept ideas on top of it using Photoshop.
As you can see I've started with a base mesh from the Gnomon Workshop just to get me going that little bit faster. After subdividing it a few times I get stuck in using clay build up with the soft circle alpha (Alpha 06), just to start building in forms and then smoothing them out.
This didn't have to be anything detailed or major just enough for me to know it's a human, basically the silhouette was the most important part of it.
It didn't take long at all, probably around ~20 minutes just to quickly come up with this, but using this I could come up with multiple concept ideas if needed and I have something to start with when I want to begin modelling if I choose to use this mesh.


Besides using this for a base to start concept art, this was also a good exercise for me to get back into ZBrush because it's been a long time since I've actually used ZBrush for organic sculpting (actual people/humanoids). So this was a successful attempt to get my skills back up to par of where they were before and from now on hopefully to improve a lot more.

Wednesday, 15 May 2013

Ideas generation

I didn't put much thought into what I wanted to do in fact it was a really random thought, but I liked it and decided to go with it. My idea was some sort of part cyborg samurai. The concept was that he was an injured samurai that had been somehow sent to the future and repaired by having his body infused with robotics. Seems bizarre but I know that it would look good.

He would look like a traditional samurai except half his body is robotic, with pipes connecting to his body acting as some form of veins transferring blood or other bodily fluids around so that his body circulates properly, and of course he'd be equipped with a traditional samurai sword. 

Here is the first moodboard I put together with some reference I felt to be relevant to this character design. 


You can see a fair amount of samurai swords in the mood board which I feel are key to when you're going to design any type of samurai, there's a form of elegance to them which you can't just model out of imagination. 
Towards the top right you can see the robes that a samurai wears and even though half his torso would be robotic I'd still like to keep a traditional look to him by wearing those robes. The rest of the images are all robotic/cyborg and these were just to be used as reference for the type of modelling I'd like to achieve even if it isn't the same design at all.

The Open Project

This is something I've personally looked forward to since we got news about it, and the minute I heard about it I knew what I was going to do, a full character design using my favourite program - ZBrush.My aim was to take what I'm best at and evolve it into something new, whilst enjoying it. So take ZBrush, I've used this program quite thoroughly throughout the past year but I wanted to do something new using it. I've already made high-res models, and I've turned those high-res models into game-res ones too. So this time (and it was a pretty quick decision) I wanted to do take a high res model and turn it into a still image render using Photoshop as my program of choice to compose the different renders together to make something that's visually appealing.

This is my project brief customised for the current open project -
http://www.mediafire.com/view/?n5uu22pbmnrgqem

In this project brief towards the end there's a time schedule of when I aim and plan to complete certain goals I've set myself. I plan to keep track of time and how much I do each week.


So without further ado it's time to get together some reference and begin with some concept art!